Who’s this for?
Anyone writing Markdown in Obsidian who wants a slick, fast, free website with as little friction as possible.
You’ll learn: installing Hugo, organising your vault, version-controlling with Git, automating front-matter, and deploying to the web.*You’ll get a site just like the one you’re reading this from :)
1. Install Hugo
Hugo is the engine that turns plain text into a lightning-fast static site. Let’s get it running first. Check their awesome docs if you have any doubts along the way https://gohugo.io
- With Homebrew:
brew install hugo
- Verify the installation:
hugo version
What just happened?
Runbrew upgrade hugoonce in a while for new features. Sometimes when you upgrade Hugo, Templates can become obsolete, so, keep in mind that after upgrading, you need to double check the template as well.
2. Create Your Hugo Site Inside The Obsidian Vault
Big picture – By parking the site inside your Obsidian vault, you can write, preview and publish without juggling apps.
- In Obsidian, create a folder that will hold your future website. I call mine
09‑Siteso it sits near the end of my vault tree, but any name works. - Open Terminal and change into that folder:
cd /path/to/yourVault/<siteFolder>
- Bootstrap the site skeleton, name it however you’d like (change
my-site):
hugo new site my-site --format yaml
You should end up with a basic structure like like this:
Obsidian Vault
├── 01 Folder
├── 02 Folder
...
├── 09 Site
	└──my-site/    <----- This is your Hugo site folder
		├── archetypes/
		├── assets/
		├── content/
		├── data/
		├── hugo.yaml
		├── i18n/
		├── layouts/
		├── statics/
		└── themes/
└── 10 Templates
	└── siteDefault
Lost? Keep this structure nearby. If anything feels off, rebuild with
hugo new site …– it is non‑destructive as long as you keep backups.
3. Dress It Up With a Theme
What’s a theme? Think of it as your site’s wardrobe—fonts, colours and all-round vibes. Hugo themes live in themes/ and are dead-easy to swap. Swap themes, swap the vibe—no rewriting posts.
Browse themes.gohugo.io and pick something you like. In this guide I’m using PaperMod as an example.
- Inside
my-site/run the following commands to install the theme- You may also need to install Git - see the section 4.2 Installing Git
- Stay on your site root folder
git init # Initialize a git repository
git submodule add --depth=1 https://github.com/adityatelange/hugo-PaperMod.git themes/PaperMod
git submodule update --init --recursive # needed when you reclone your repo (submodules may not get cloned automatically)
- Edit
hugo.yamlto include the theme you installed:
baseURL: https://example.org/
languageCode: en-us
title: My New Hugo Site
theme: PaperMod	              # Add this line
House-keeping – Unless you love nested Git histories, delete the hidden
.gitinsidethemes/PaperModafter pulling it in.
Cool Tip: You can view hidden files (like
.obsidianor.git) by pressing⌘ + Shift + .
4. Put the Whole Thing Under Version Control
Why bother with Git? Git remembers every change, saves you from “oops” moments, and is required for painless deployment down the line. Relevant in this tutorial as it is also the way to integrate with Cloudflare Page Workers.
4.1 Create a Github Account
Create an account at github.com
4.2 Installing Git
Install Git on your machine. If you have macOS, it’s likely that Git is already installed. To check:
git --version
If the command is missing, install it with Homebrew:
brew install git
4.3 Tell Git who you are
git config --global user-name "your username" #<yourusername>
git config --global user.email "[email protected]" #[email protected]
4.4 Pick an authentication method for GitHub
4.4.1 Option A - SSH Key (Recommended)
I recommend SSH keys because they never expire. If you don’t have an SSH key on your mac, generate one, otherwise, skip to step 3.
- Generate a key (ed25519 recommended):
ssh-keygen -t ed25519 -C "[email protected]"
- Start the ssh-agent and add the key:
eval "$(ssh-agent -s)"
ssh-add ~/.ssh/id_ed25519
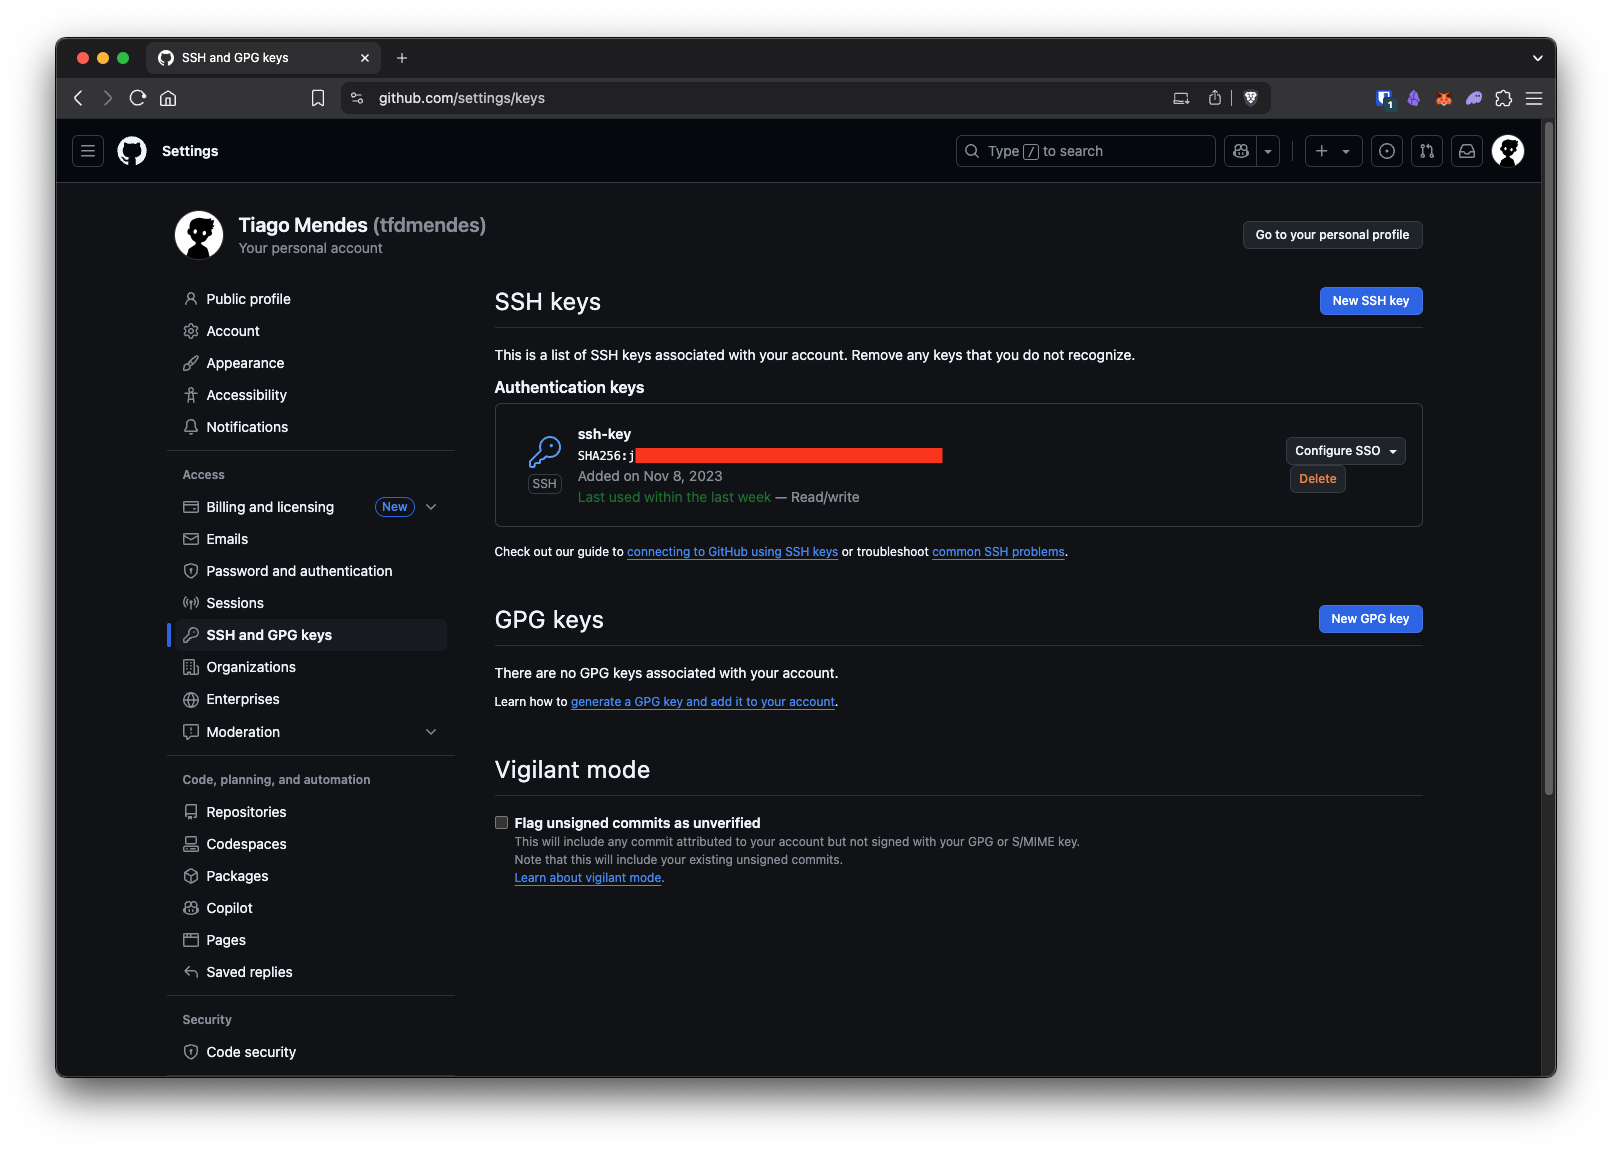
- Copy the content of
~/.ssh/id_ed25519.puband add it toGitHub -> Settings -> SSH and GPG Keys- Do not copy the private key!
- Create an SSH Key (Profile → Settings → SSH and GPG Keys) and give it a name. What it should end up looking like:
4.4.2 Option B - Personal Access Token (HTTPS)
Github.docs - don’t bother
4.5 Create a repository in Github
- Open your profile (icon on the top right) and open
Your Repositories - Select
New. Give it a name (call itobsidian-siteor similar) . Leave every tick-box blank
4.6 Initialize the repository locally and push the first commit
After creating your Remote Repository (in Github), it’s time to head back into the Terminal and go to the folder my-site/ we setup before
cd /path/to/my-site
If you didn’t delete the previous
.gitand.gitsubmodulesfolders after installing the theme. Do it now :)
Now, let’s push everything into Github
git init                           # start local repo
git add .                          # stage everything
git commit -m "Initial commit"     # first snapshot
git branch -M main                 # ensure branch is called main
git remote add origin [email protected]:tfdmendes/obsidian-sync.git # Replace the URL
git push -u origin main         # upload to GitHub
Git doesn’t track empty directories, so don’t worry if you don’t see some of the folders from the site skeleton in your repository.
If you see permission errors, confirm that
ssh -T [email protected]welcomes you by name – this indicates the key is working.
5. Write Posts in Obsidian
Finally, the fun part! Everything under my-site/content/ becomes a page on your site. I like year folders (content/2025/, content/2026/ …) but Hugo won’t mind if you skip that.
5.1 Automate front-matter with Templater
Why bother? Front-matter tells Hugo how to render a page, but typing it by hand gets dull fast.
- Install Templater
- Make a note
BlogTemplate.mdinsideTemplates(or wherever you store templates). - Paste this magic snippet:
---
date: 2025-06-22T17:00:41+01:00
publishDate: 2025-06-22T17:00:41+01:00
draft: true
title: cybersecurity
tags:
---
- Go to Templater’s Settings
- Enable Trigger Templater on new file creation
- Enable folder templates
- Link your
siteFolderto thesiteTemplatenote you just created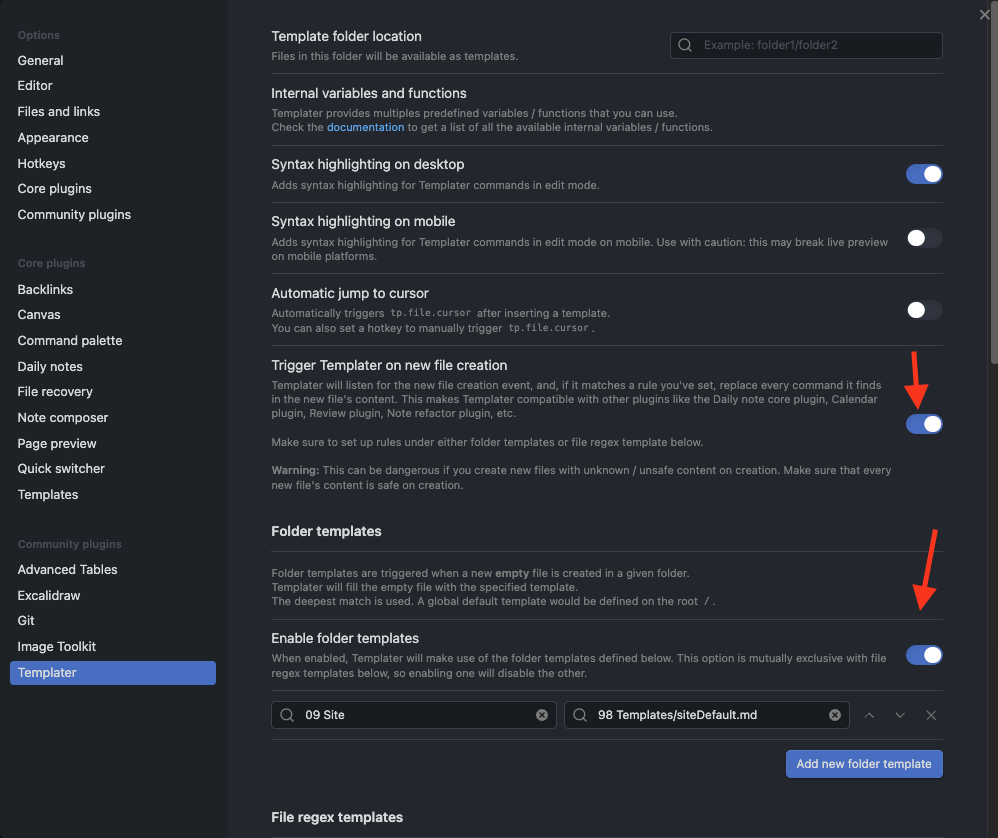
Result: every new note in
content/spawns with the correct front-matter—no more copy-pasta.
6. Auto-Sync Obsidian ↔ GitHub
Why this step? The Obsidian Git plugin lets you commit & push without leaving the editor (or set it to auto-push in the background).
- Install & enable the plugin.
- Settings → Obsidian Git → Advanced → Custom base path → full path to
my-site(blank if your vault is that folder). - Click the ↑ icon to push on demand, or enable auto-push in plugin options.
The ↑ icon is the one you’ll use the most. It allows you to push your changes — such as creating a new Markdown file (in other words, a new note) — to the Github repository we set up earlier in step 4.5 Create a repository in Github
6.1. Links in obsidian (important)
Select settings -> Files and Links -> Turn off “Use wikilinks”
7. Configure the cloudflare engine
Why this step? Cloudflare builds Hugo for you on each push and hosts the output on a global CDN—lightning fast, zero cost.
-
Log into Cloudflare → Pages → Create a project.
-
Pick your GitHub repo, accept the build command
hugo, leave everything else default. -
Hit Save & Deploy. A minute later your site lives at
https://<project>.pages.dev/. -
Add a custom domain under Pages → Custom Domains when ready.
-
As final step, you need to add two Variables in your site’s settings :
- HUGO_VERSION = 0.147.0 (check your version and change accordingly)
- TZ = Europe/Lisbon (change to your zone)
More detailed docs: developers.cloudflare.com/
Quick Recap
- Install Hugo → 2. Create site in vault → 3. Add a theme → 4. Version with Git
- Write posts (auto front-matter) → 6. Sync via Obsidian Git → 7. Deploy on Cloudflare.
Click a button and your words are live for the world. Happy publishing! :)